PolarProxy is a transparent SSL/TLS proxy designed to intercept and decrypt TLS traffic, and save it in PCAP format so that we can analyze it further using Wireshark. PolarProxy is also installed by default in REMnux.
VM Configuration
REMnux
PolarProxy will listen on port 10443, for that we have to redirect traffic 443 to 10443. To do this we have to create some iptables rules. ens37 here is my Host-only interface, you can customize it yourself:
sudo iptables -A INPUT -i ens37 -p tcp --dport 10443 -m state --state NEW -j ACCEPT
sudo iptables -t nat -A PREROUTING -i ens37 -p tcp --dport 443 -j REDIRECT --to 10443
After the rule is created, to run PolarProxy you can use the following command:
You can customize the destination PCAP file location, in this case I saved it in the user directory named polarproxy.pcap.
Windows
Next, you need to install the root CA certificate from PolarProxy on your Windows VM. For that you have to download the certificate file first by visiting the following REMnux VM address, for example in my case: http://192.168.126.100:10080/, then the polarproxy.cer file will be downloaded automatically.
Windows:
Double click the polarproxy.cer file and click [Install Certificate…]
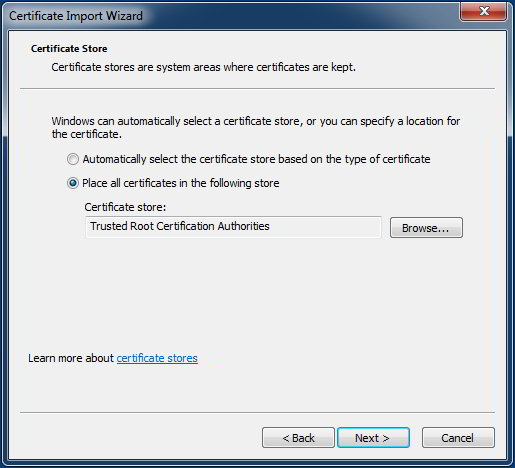
Click [Next] and then select “Place all certificates in the following store“
Click [Browse] and select “Trusted Root Certification Authorities” and click [OK]
Click [Next] and [Finish]
Certificate Import Wizard
Firefox:
Go to [Options > Privacy & Security]
In the Certificates section, click [View Certificates…]
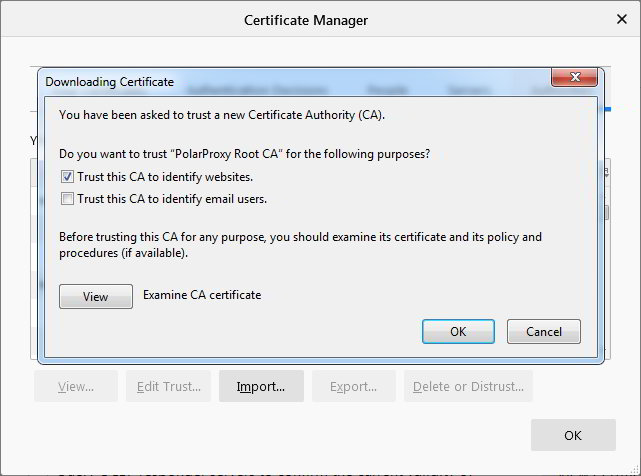
On the Authorities tab, click the [Import…] button and select the polarproxy.cer file
Check “Trust this CA to identify websites” and click [OK]
Firefox Certificate Manager
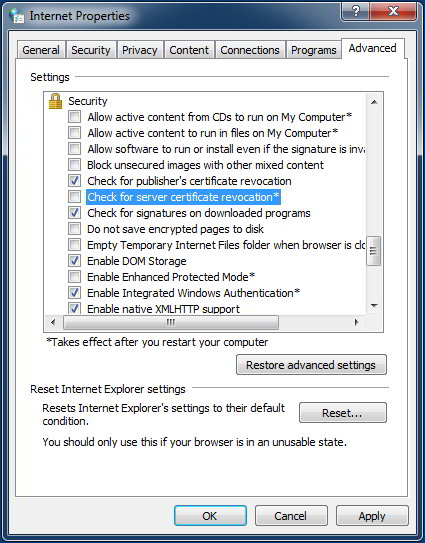
Additionally we can disable the certificate revocation check:
In the Run box execute the following command: inetcpl.cpl
Click the tab [Advanced] and scroll to the bottom named [Security]
Uncheck the “Check for server certificate revocation” then click [OK]
And restart the VM.
Internet Properties
If everything is running smoothly, now you can create a snapshot of the VM. Configuration on this VM can also be applied to your other VMs.
When performing malware analysis, we must ensure that the environment we are using is completely safe and controlled. This is done to isolate our lab machines from affecting or even infecting the entire network, but also to prevent any of our data from leaking and entering into this lab machine.
Requirements
This Lab uses a virtualization system, so we don’t need a lot of hardware, just one PC or laptop is enough:
PC/Laptop with Windows 10 (as Host)
It is recommended to have a large enough RAM >8GB
Enough storage space (SSD is highly recommended)
VMware Workstation (you can also use other virtualization software such as VirtualBox, because in general the method is the same, and you just need to adopt it)
REMnux VM
VPN (optional but recommended)
Make sure the Windows has been updated to the latest version. And I consider that you have also installed VMware Workstation.
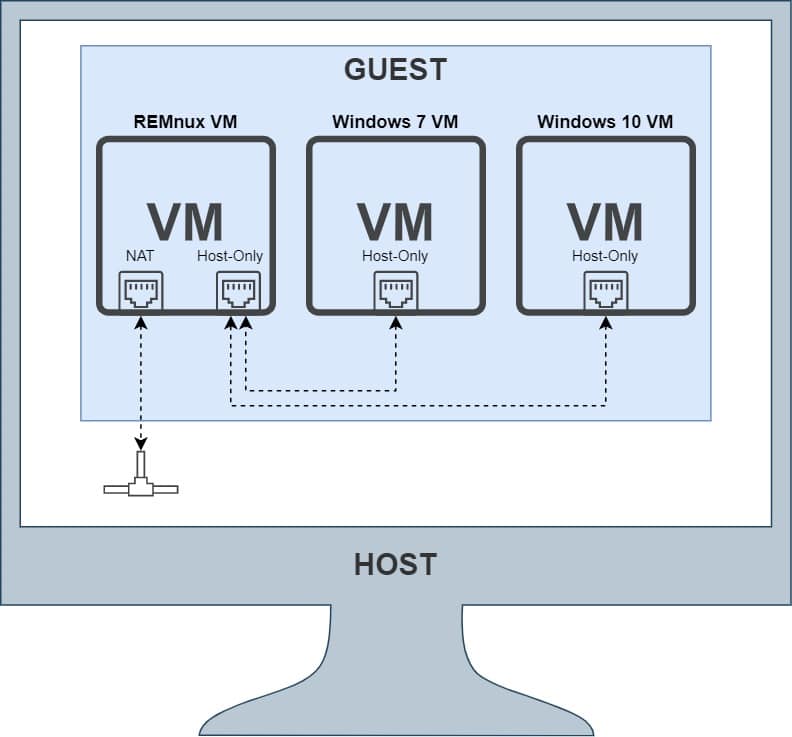
For Guest machines, at least later we will have two virtual machines, a Linux-based VM using REMnux distro, and Windows-based VM, of course you can also install several more VMs as needed.
REMnux is a Linux distro that was made specifically for malware analysis purposes and has various tools installed, and you can download the image from their site: https://docs.remnux.org/install-distro/get-virtual-appliance. The downloaded image is already in OVA format (Open Virtualization Format), so you don’t need to install it from scratch and just import it into your VMware Workstation.
For Windows VM, you can use Windows 7 or Windows 10, and it is recommended to use the 64-bit version, so it can cover both 32 or 64 bit malware. If you think Windows 10 is too heavy, you can just use Windows 7 and that is more than enough from my experience.
Network Configuration
Apart from being used for malware analysis, we will also use REMnux as a gateway for other VMs. So traffic from other VMs will pass through REMnux first, then forward it to the NAT network in REMnux so that it can access the internet. In REMnux, we can also capture the passing traffic for further analysis.
Host
As we know VMware Workstation supports several connection modes such as Bridged, NAT, and Host-only. For the VM, we will mostly use the Host-only network configuration. Bridged configuration is not recommended, because your VM will be on the same network as the Host, so anyone can access the network.
The network configuration I use is as follows:
Local Area Network
192.168.10.0/24
NAT Network (VM)
192.168.246.0/24
Custom Host-Only Network (VM)
192.168.250.0/24
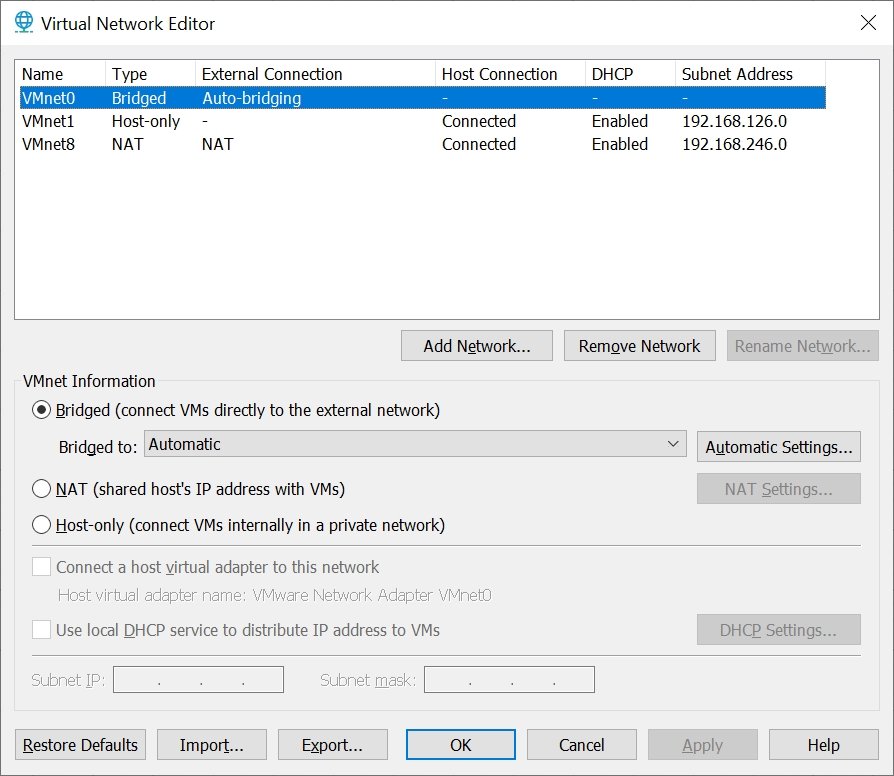
You can view your VM network information through the Virtual Network Editor.
VMware Virtual Network Editor
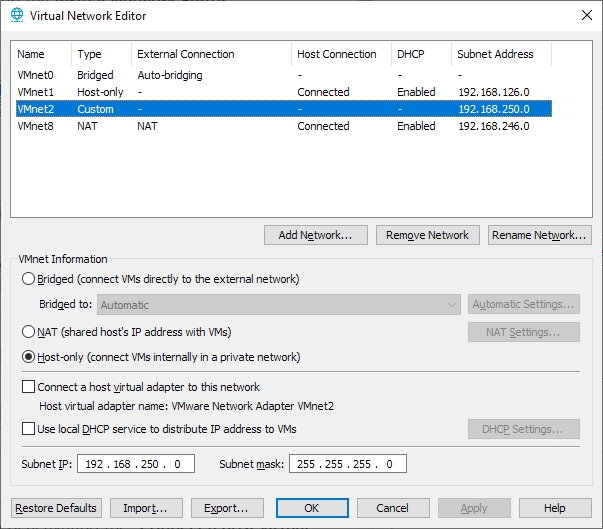
Here we will add one more Host Only based VMnet, as follows:
In the Virtual Network Editor, click the [Add Network…] button.
In the window that appears, in the “Select a network to add:” select for example [VMnet2].
Next select the network in the table and select “Host-only (connect VMs internally in private network)“
In the “Subnet IP:” section, you can change it as you wish, in this case I used “192.168.250.0” for “Subnet IP” and “255.255.255.0” for “Subnet mask“.
Additionally, if desired you can also completely isolate the Host-only network by disconnecting it from the Host, via the Virtual Network Editor by deactivating the “Connect a host virtual network adapter to this network” option for the Host-only adapter.
REMnux VM
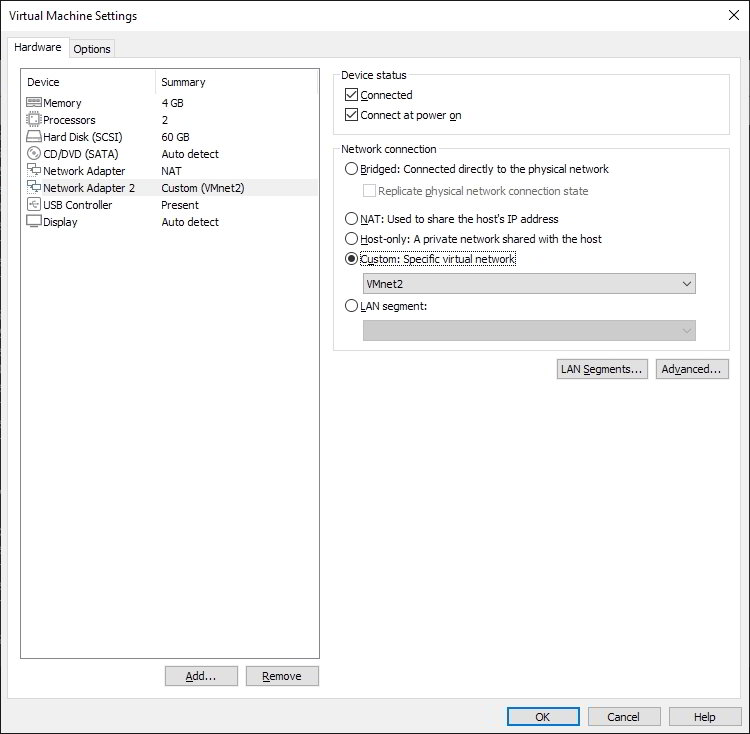
By default this VM only uses one Network Adapter, here we need to add one more network adapter and adjust its connection mode.
REMnux Virtual Machine Settings
The method is as follows:
Go to the Virtual Machine Settings via [VM > Settings].
Change its network connection mode to NAT.
Add one more network adapter by clicking the [Add] button, select [Network Adapter], and clicking [Finish].
Click on the newly created [Network Adapter 2] and change its network connection mode to [Host-only].
Click on [Network Adapter 2] and change its network connection mode to [Custom: Specific virtual network], and select [VMnet2].
Click the [OK] button to save changes.
Next we will change the IP address and routing configuration:
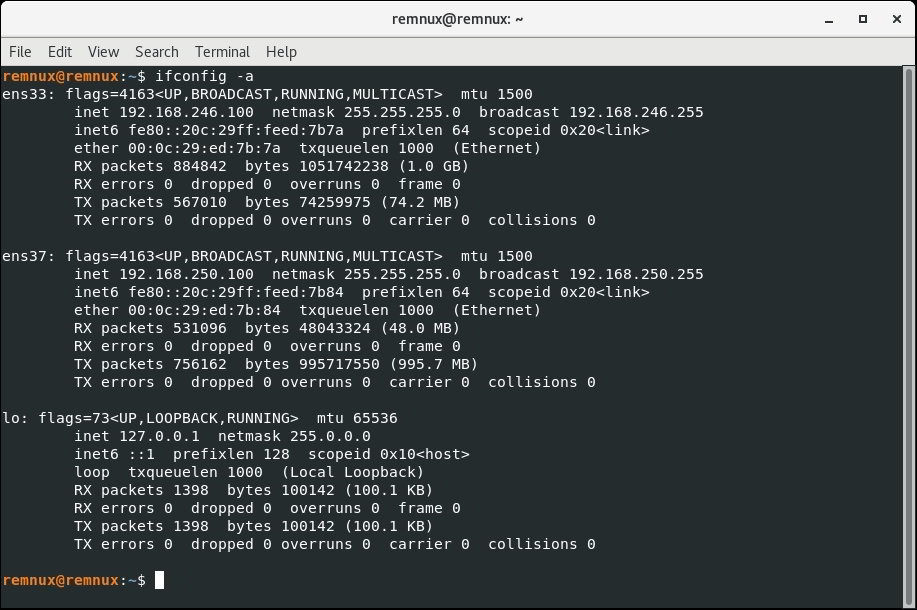
Run ifconfig -a in Terminal to see a list of network interfaces.
In my VM it shows that Network Adapter 1 (NAT) is detected as ens33, and Network Adapter 2 (VMnet2) is detected as ens37. This may be different in your VM.
Edit the network interface configuration file: sudo nano /etc/netplan/01-netcfg.yaml
I use static IP for both interfaces. Here I use IP 192.168.246.100 for Network Adapter 1 (NAT), and because NAT can connect to the internet, we have to set the gateway and DNS as well, which here I set 192.168.246.2 (see Virtual Network Editor) and DNS 1.1.1.1 and 1.0.0.1. For Network Adapter 2 or VMnet2 (Host-only) I use IP 192.168.250.100. You can of course customize it yourself.
network:
  version: 2
  renderer: networkd
  ethernets:
    # Network Adapter 1 (NAT)
    ens33:
      dhcp4: no
      dhcp6: no
      addresses: [192.168.246.100/24]
      gateway4: 192.168.246.2
      nameservers:
        addresses: [1.1.1.1, 1.0.0.1]

    # Network Adapter 2 (Host-only on VMnet2)
    ens37:
      dhcp4: no
      dhcp6: no
      addresses: [192.168.250.100/24]
Once finished we need to apply the configuration: sudo netplan apply
Run ifconfig -a again and make sure both interfaces are using the IP address that we set earlier.
Enable the IP forwarding:
echo 1 | sudo tee -a /proc/sys/net/ipv4/ip_forward
sudo sysctl -w net.ipv4.ip_forward=1
Next we will create some iptables rules so that the VM can access the internet. ens33 is my NAT network that has internet access, and 192.168.250.0/24 is the Host-only network range used in each VM.
sudo iptables -t nat -A POSTROUTING -o ens33 -s 192.168.250.0/24 -j MASQUERADE
sudo iptables -P FORWARD DROP
sudo iptables -A FORWARD -m state --state RELATED,ESTABLISHED -j ACCEPT
sudo iptables -A FORWARD -s 192.168.250.0/24 -j ACCEPT
sudo iptables -A FORWARD -s 192.168.250.0/24 -d 192.168.250.0/24 -j ACCEPT
That’s it. Now the network configuration in REMnux is complete.
📝 Notes
Keep in mind that iptables rules are not persistent so they are not survive for every reboot. If you want the rule to be applied every time you reboot, you can simply create a script that executes every reboot, or use the iptables-save and iptables-restore tools in REMnux. Or you can also install a package called iptables-persistent (sudo apt install iptables-persistent).
VPN (Optional)
If you don’t feel comfortable having your public IP exposed to the internet when analyzing malware, you can use a VPN. We can install this VPN on the REMnux VM so that later it can be used by all VMs connected through this REMnux gateway.
The method is as follows:
Install OpenVPN:
sudo apt-get update
sudo apt-get install openvpn
Place your VPN configuration file in the /etc/openvpn/client/ directory, for example named myvpn.ovpn.
To run the OpenVPN, use the following command:
sudo openvpn /etc/openvpn/client/myvpn.ovpn
If OpenVPN displays the “Initialization Sequence Completed” log in the terminal, it means that you are now connected via VPN.
Now we need to add more iptables rules to allow traffic to go through this VPN. tun0 is the interface of the VPN (you can check it using ifconfig -a to be sure).
When you are done with all the configuration in the VM, it is highly recommended to make a snapshot so that you can revert to its original state if something goes wrong.
Windows VM
On a Windows VM we need to change the connection mode and its IP:
Go to the Virtual Machine Settings via [VM > Settings].
Click on [Network Adapter] and change its Network connection mode to [Custom: Specific virtual network], and select [VMnet2].
Click [OK] to save the changes.
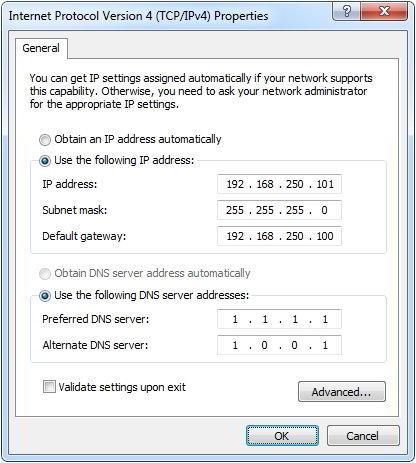
After that you need to change the IP address in this VM by going to Network adapter setting in Control Panel.
Windows network adapter settings
In this VM I use IP 192.168.250.101 with gateway set to REMnux VM (192.168.250.100). For DNS I use DNS Cloudflare 1.1.1.1 and 1.0.0.1.
At this point, we have applied the network configuration. Please test whether it can access the internet properly.
Packet Capture
For monitoring traffic on a VM network, you can run Wireshark or tshark in REMnux.
Wireshark
To simplify traffic analysis, now we will configure Wireshark to make it more comfortable to use.
Profile
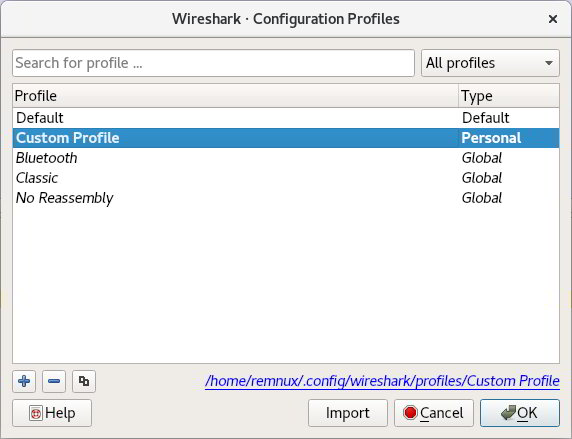
Before we change some of the settings in Wireshark, it’s a good idea to create a separate profile. This will be quite handy if we want to switch profiles, or if we want to save and or copy the profile to another machine, so there is no need to set it up from scratch.
Wireshark Profile Configuration
First we’ll make a duplicate of the Default profile:
Click the [Edit] menu then [Configuration Profiles…]
Click on the Default profile, then click the copy button in the lower left corner to copy the profile.
Rename the profile to let say “Custom Profile“.
Click the [OK] button when done.
Columns
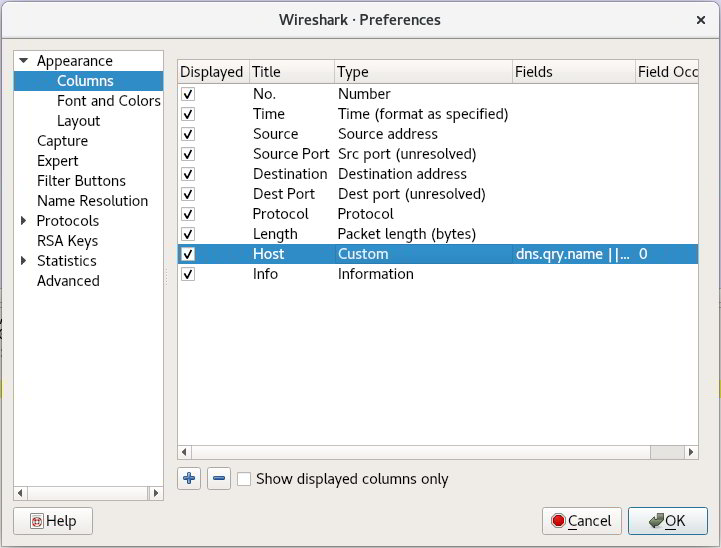
We’ll be adding fields like Source Port, Dest Port, and Host, which will be very useful for our day-to-day analysis.
Wireshark Column Preferences
Right click on any column header, then click [Column Preferences…]
First we will add the Source Port column. Click the [+] button to add a column.
Double click on the newly created Title and type “Source Port“.
Double click on Type, in the drop-down that appears select “Src port (unresolved)“.
Second, we add the Dest Port column. Click on the [+] button to add a column.
Double click on the newly created Title and type “Dest Port“.
Double click on Type, in the drop-down that appears select “Dest port (unresolved)“.
Now we will add the Host column. Click on the [+] button to add a column.
Double click on the new Title and type “Host“.
Double click on Type, in the drop-down that appears select “Custom“.
Double click on Fields and enter “dns.qry.name || http.host || tls.handshake.extensions_server_name“
Then you can drag the newly created columns so that the order is the way you want.
If you have clicked the [OK] button to save.
Time Format
By default Wireshark displays the date and time format in the form “Seconds Since Beginning of Capture”, here I will usually convert it to local time or even to UTC.
Click the [View] menu, then [Time Display Format], and select “UTC Date and Time of Day“.
Still in the same menu, also click on “Seconds” (the default is Automatic).
Filter
Wireshark has a filter feature which is very useful when we want to display data packets that only we want. In most cases I usually just want to display web traffic, and use the following filters:
In the filter box, enter the following command:
(http.request or tls.handshake.type == 1 or tcp.flags eq 0x0002 or dns) and !(udp.port eq 1900)
Here I want to show only HTTP traffic (http.request), or SSL/TLS (tls.handshake.type == 1), or TCP SYN packets (tcp.flags eq 0x0002), or DNS traffic. To minimize irrelevant data, I also eliminated SSDP traffic (udp.port eq 1900).
To save the filter, click the [+] button next to the filter box.
In the Label section, enter the filter name, for example “My Filter” or “Web Traffic“.
Click the [OK] button if so.
The save filter feature is quite handy, because now you just have to click the [Web Traffic] button which is created next to the filter box, without having to manually write it down again.
TShark
If you don’t want to use a GUI version, you can use TShark as an alternative. TShark is a terminal-based of Wireshark.
For example, if you want to capture traffic from all interfaces and save the results in a PCAP file, you can use the following command:
tshark -i any -w ~/tshark.pcap -P --color
The -P parameter will display the captured traffic on the terminal screen, and the additional parameter --color will display colored text just like Wireshark, and here I set the captured packets in the user directory called “tshark.pcap“.
Windows Firewall
When we capture the traffic directly from the VM, Wireshark is often filled with unwanted irrelevant packets, such as SSDP (Simple Service Discovery Protocol) packets, which can come from the Guest or even the Host network. For that we can block the packets from the Host side using Firewall in Windows, so that the Host doesn’t forward the packets to the Guest or VM.
For security purposes, I personally also don’t want any information from the Host to be exposed to the Guest, so I also usually block the other packets related to Name Resolution and NetBIOS, so that the packet is not forwarded to the Guest or VM. Especially if your host is also connected to an office network or office VPN.
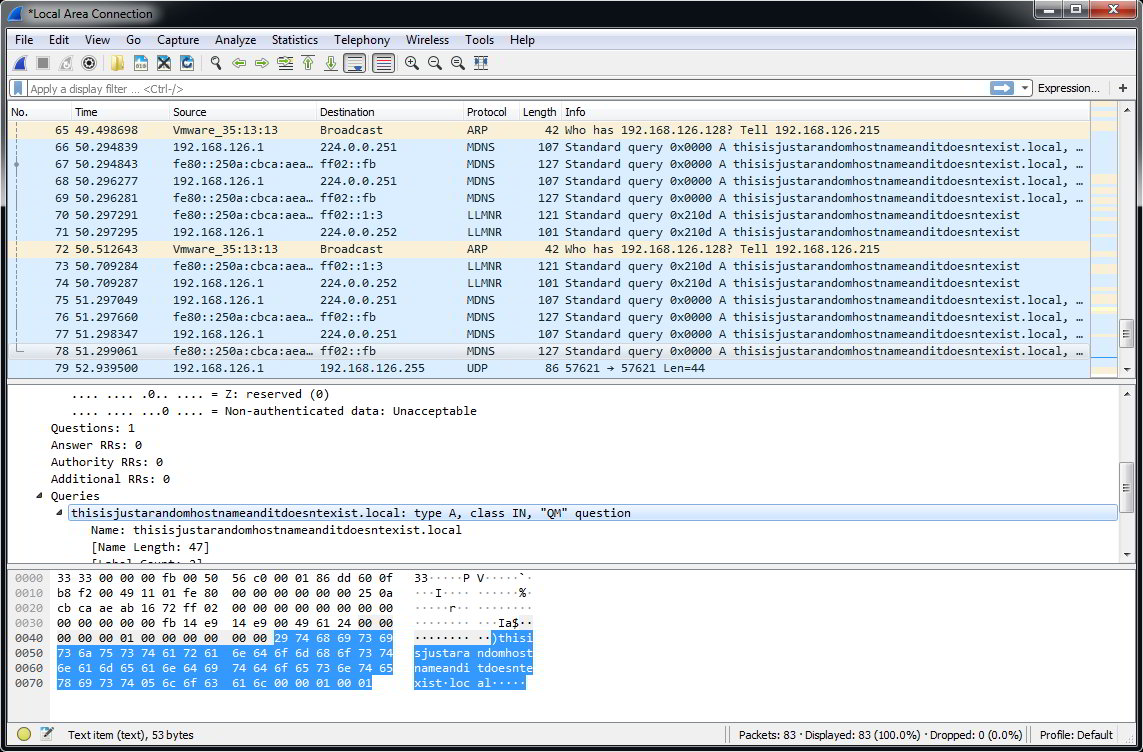
Small information such as for example DHCP lease renewal will usually be broadcast to the entire network. Another example, suppose you type any hostname in the browser which doesn’t actually exist, for example, here I type “thisisjustarandomhostnameanditdoesntexist“, then the request will also be broadcast to all networks, including Guest or VM which even use Host-only mode. Therefore, here I try to minimize the information that can be sent to the Guest or VM network as much as possible.
Beberapa paket MDNS and LLMNR
As you can see in the image above, I ran Wireshark on a Windows VM and it capture several MDNS and LLMNR packets coming from the host.
So, I’ll usually block packets coming from:
SSDP (Simple Service Discovery Protocol, UDP Port 1900)
MDNS (Multicast DNS, UDP port 5353)
LLMNR (Link-Local Multicast Name Resolution, UDP port 5355)
NBNS/WINS (NetBIO Name Service, UDP port 137)
BROWSER (UDP port 138)
The method is as follows:
On the Host side, go to Windows Defender Firewall with Advanced Security.
On the left side of the screen, right-click [Outbound Rules] and select [New Rule…]
In the “New Outbound Rule Wizard” window, select [Custom] and click [Next >]
Select [All programs] and click [Next >].
In the “Protocol type” select [UDP], then in the “Remote port” select [Specific Ports] and type the following ports: “1900, 5353, 5355, 137, 138“, then click [Next >] again.
In the “Which local IP addresses does this rule apply to?” select [These IP addresses].
Next we will fill in the network address that we will block by clicking the [Add…] button.
Select [This IP address or subnet:] and enter the IP of the NAT network adapter that is on the Host side (usually named VMware Network Adapter VMnet8), in my case it is 192.168.246.1, then click the [OK] button
Then add another IP in the same way by clicking the [Add…] button, this time the link-local IPv6 address of the Host-only network adapter on the Host, for example in my case “fe80::d03c:db70:88c1:2d88“, then click the [OK] button
If the IP has been added, then click [Next >].
Select [Block the connection] and click the [Next >] button.
In the next window select “Domain“, “Private“, and “Public” (usually checked by default), then click [Next >]
In the Name field you can enter, for example “Block some ports for VMnet2” and click [Finish]
You can apply these rules to other networks if you want.
Hint & Tips
If you want to create an autorun script in REMnux, for example you want to run the command to create the above iptables rule automatically every time you reboot, you can place it in the /etc/rc.local file.